I received a sample hank of Mrs. Crosby Loves to Play - Train Case in Spangled Cotinga the other day and was told to test it out.
First of all I'm super excited to have the chance to test a yarn for the first time! HA!
I love the color way. The hand dyed semi solid Spangled Cotinga is a cool ice blue color and really speaks to me. I can envision a nice pair of gloves for the winter out of this icy blue Merino, Nylon and Viscose blend. But I had to rein myself in and actually knit a test swatch.
The recommended needle size for this yarn is a US 1.
I used a US 3, and I am very happy with the airiness of the fabric. I would recommend wooden needles due to the fact the yarn was very slippery and I needed a little more grip then what I got with metal needles. But, that is personal preference and nothing against the yarn.
All in all, I love the yarn. I love the color way and am very happy with the fabric. I envision so many projects with this yarn. I can't wait to get started with a project! This yarn left me very inspired and excited to find the perfect pattern for a nice pair of winter gloves, or a scarf, maybe even a matching tam or shawl...
Oh so many ideas are floating around in my creative head!
Wednesday, October 21, 2015
Wednesday, September 23, 2015
Below No Show Socks

Please follow this Blog for more exciting new patterns to come!
Below No Show Sock
Materials:
1 Ball of Sock weight yarn approximately 3 oz.
5 Size 2US double pointed needles (this can be done using 4)
1 Ball of Sock weight yarn approximately 3 oz.
5 Size 2US double pointed needles (this can be done using 4)
5 Size 00US double pointed needles (this can be done using 4)
Size G Hook and waste yarn
Cast On 33 stitches for each sock.
Using a provisional cast-on, cast on 33 stitches (this will be half the circumference of the sock).
Provisional Cast-On:
Using waste yarn, crochet a chain that is a few chain stitches longer than the number of knit stitches you need. Knit into the spine of the back side of the chain, 33 stitches.
Purl back across stitches.
Row 1: Sl 1, K until last St. WYF Sl the last St as if to P.
Row 2: Wrap the yarn loosely around the first St and Sl as if to P, P across to 1 before the last St, WYF Sl last St.
Repeat Row 1 & 2, 9 more times.
Your Toe is now half way done.
With right side facing you. This will be a knit row, you will now begin incorporating your wraps and closing up the holes to form the cup for the toe of the sock. If you prefer a narrow toe, continue with Row 1 & 2. If you want a more square toe do less of Row 1 & 2. The working stitches in the middle will determine the width of the point of the sock.
Row 1: K across middle St to the first wrapped stitch. Use the tip of your needle to pick up the wrap from the back side of fabric and place it on the left needle and knit it together with the St. WYF, Wrap the next stitch (so that it now has two wraps) Sl next St then turn.
Row 2: Sl the first (double-wrapped) St and P across to the first unworked, wrapped St. Pick up the wrap from the back of the fabric and P it together with the St. Wrap the next St and turn.
Continue until you have worked all the stitches and you once again have 33 working stitches.
Unzipping the Provisional Cast-On:
Insert the tip of your needle into the stitch you knit up from the Provisional Cast-On. Then undue the tail of your waste yarn by pushing in back through the last loop and unzip the chain slowly as you pick up the live stitches from your Cast-On.
You now have a total of 66 stitches.
Knit in the round.
Top of the Foot
Round 1: K all Sts.
Repeat the established pattern for 1 inch.
Bind off 33 St. K33
Bottom of Foot:
Row 1: Sl 1, P32
Row 2: Sl 1, K32
Row 3: Sl 1, P32
Repeat Rows 2 & 3 until you are 1 inch from heel of the desired length.
Turning the Heel:
With the Bottom of the Foot facing you, you will begin the heel.
Row 1: Sl 1, K until last St. WYF Sl the last St as if to P.
Row 2: Wrap the yarn loosely around the first St and Sl as if to P, P across to 1 before the last St, WYF Sl last St.
Repeat Row 1 & 2, 4 more times.
Your Heel is now half way done.
With right side facing you. This will be a knit row, you will now begin incorporating your wraps and closing up the holes to form the cup for the heel of the sock.
Row 1: K across middle St to the first wrapped stitch. Use the tip of your needle to pick up the wrap from the back side of fabric and place it on the left needle and knit it together with the St. WYF, Wrap the next stitch (so that it now has two wraps) Sl next St then turn.
Row 2: Sl the first (double-wrapped) St and P across to the first unworked, wrapped St. Pick up the wrap from the back of the fabric and P it together with the St. Wrap the next St and turn.
Continue until you have worked all the stitches and you once again have 33 working stitches.
Bind off all stitches.
Edging:
Using Size 00US Dpns, pick up all stitches around the inside of the sock.
spread stitches evenly among Dpns.
I-Cord Bind Off Edging:
K3, Sl knitted 3 St back to left needle Purlwise.
K2, K2TBL, Sl 3 St back to left needle Purlwise.
Continue until you have the last 3 stitches. Then K3TBL pulling through.
Weave in ends.
Optional:
Using elastic beading wire and beading needle you can run a line through the I-Cord. This will give some gather.
You can use a little a dab of silicone under the edging at the heel to help keep the sock in place. I used E6000 glue and a wet finger to form it into an oval. The glue holds up well in the washer and dryer and gives enough grab to keep the back of the sock in place while having shoes on.
Saturday, July 18, 2015
It can happen!
It can happen...
In all the rush to pack up our firework tent after the 4th of July my second set of socks disappeared. I have a firm belief they are in the trailer waiting until next year when we unpack. So... With that being said its time for me to dig out another pair of needles and accoutrements and start something new.
I rummaged through all may cubbies and hiding holes and I was amazed to find a sweater I started almost two years ago. Even more amazed I'd forgot about it. I pulled it out to find I was at the end and all I had to do was bind off and block. What the heck!! I can only chalk that up to pregnancy brain. I casted off and now I have a lucky pair of needles to use to start a new project.
I've finally had time to read the Summer 2015 Interweave Knits magazine and found a headband I wanted to try and knit. I grabbed a ball of purple yarn and threw it all in a plastic shopping bag as I headed out the door to go to our cabin for the weekend.
I'm here now and I'm not sure how much knitting I'm going to get done. Our cabin was hit by high winds and flash flooding and we have a lot of clean up. Basically what was the gravel road leading to our cabin is now up against our porch. A green mold has covered all fabric surface and dirt and dust is every place.
My only salvation is I know I have a 2 hour ride home on Sunday. That is prime knitting time.
Sunday, June 14, 2015
I Visted My Yarn Room this Morning
Oh Boy! I went downstairs to do the laundry and was side tracked by my messy, very messy yarn room. The poor room has been neglected lately due to the fact I have been working on so many different things. So I took a little time, and dug through some things and found a couple of UFO that I had totally forgot about. One was a scarf that I started maybe 3 years ago, I have no idea what the pattern was, but after taking a look I think I can make it into a cowl and call it good. I found a baby blanket that was started by another lady, then given to me to finish about 2 years ago. It's a simple pattern that I think I can pick up and finish. I found others that I had no idea what I was doing. Those will be frogged or donated to the trash man. I can't believe that I have let my knitting room go so bad. I am totally embarrassed at the stage of disarray. But, I don't have time to really dig in and get it shaped up. So I will be adding that to my to do list, for this fall. Yep, I said Fall. Only because I have so many other things on my plate that I won't have time until September or October. UGH!!
I had an idea for decoration at the yarn shop and I decided to give it a try and see how it would work out. I purchased a blow up beach ball for a $1 and the Dollar store and found some red yarn. I begun wrapping the yarn around the beach ball to form a huge ball of yarn. I had it almost covered when I ran out.... Well, as I was working in my yarn room I looked and looked for another bit of red yarn. To my surprise I have no red yarn in my stash! What the heck! But I did find 2 skeins of orange. So I think I will try again and just make it orange. But I really want red, I may have to go buy some red yarn to finish this project.
Update on Baby G, He is 8 and a half months old now. He is pulling up and just started getting the courage to let go and stand for a split second before he plops down on his bottom. He is also teething something awful right now. Along with all that, he has broke out in a horrible diaper rash. We are doing everything we can think of to clear it up. My little guy just hasn't been that happy this week.
As far as the yarn shop, I don't have much news on it. But I do have my eyes on this sweet girl that works in the quilt shop. She is a knitter too. We talked the other day and she really wants to come work in the yarn shop. I think I will see if I can snag her from the main shop to work with me. I love her personality and she has tremendous knitting knowledge. She has been knitting almost all her life. She was taught by her mother and is very much in the know of the young knitters. So I am crossing my fingers that Mary can help out in the yarn shop when it opens. I've also got my eye on a couple other ladies at the quilt shop. Nicole, I've worked with her a few times and she is very detail ordinated and once she is set on a task she gets it done. The other thing I love about Nicole, is her smile. She comes off a little shy at first, but when she smiles her face really warms up. The other young lady is Sara, however, Sara doesn't want to learn to knit and she is fitting in very well at the main quilt shop and does an amazing job. As much I would love to work with her, because she lifts my spirits every time I'm around her, I don't think it will happen.
It is exciting to visit with people about the soon to open yarn shop. It's crazy how many quilters are knitters and the are all super excited that soon we will have yarn available. I've received nothing but positive feedback from our shoppers. I'm crossing my fingers that this shop will take off like a rocket! I can't wait to find a group of knitters to share ideas with. Maybe, if we have enough local knitters we can start a knitting group one night a month.
What's on my Needles?
Well, right now I'm working on a new sock pattern. I've already titled it Big Foot. My husband has a size 13 foot and wants a pair of socks. I'm working out the numbers and trying to find a pattern that is interesting to knit but plain enough for a guy to like enough to wear them.
I've got ideas in the back of my head for an apron, revisiting my towel toper, and I might attempt another sweater.
I don't know about sweaters. I've made a few and they have all had stories of their own on how they turned out. But I have this fear in my gut about making fitted garments... To me, Socks are safe and easy. Sweaters are Mount Everest!
Wednesday, June 10, 2015
Baby, Fireworks, Yarn Patterns and Quilt Shop
Yep my plate is full right now.
First off, Baby G is turning 9 months soon and I need to get him in for his check up. He is teething and not sleeping well, thus, I am not sleeping well.
Next week our tent will be set and product delivered for our firework tent. My husband runs it, but I help with pricing, inventory control, scheduling, payroll, running to the store and breaking him so he can go home to rest and take a shower. This year the tent is setting a week earlier than normal. So instead of two weeks, we are looking at three full weeks of life under the big top. If you have never worked a firework tent, you have no idea how hard it is. I'll just leave it at that...
I've also been working on some knitting designs. A simple dish cloth and not so simple socks. I want to get a bunch together and see if I can get them published. That is a dream that I really hope comes true. Next I plan on making a pattern for a baby blanket, re-working my hat design and towel topper. When I'm done I want to have around 10 designs to package.
I'm also working at the Quilt Shop while working on everything else. It has been a blast! Recently I've had the opportunity to spread my wings a little and work in a couple of the small shops. It's been so fun! I can't tell you how many quilters I have ran into that are also knitters! They all seem very excited for the yarn shop to open.
So as of right now, I've got a check up for Baby G, Fireworks for 3 weeks, the yarn shop opening, then a small surgery for Baby G in August. Next thing I know summer will be over...
Oh and my poor garden! I didn't pick all my radishes soon enough and they went to seed. I picked a couple of turnips today and made turnip fries as a snack (yummy). Only one Cauliflower plant made it and the Broccoli looks really sad. Carrots look ok and the yellow squash has blooms. I thing most of the corn got washed away. Nothing else really made it. I think one tomato plant has got a couple of fruits on it. But this year the rain and flooding has not helped the garden grow.
So it's 2am, Baby G is finally sleeping and I need to be up in 3 and half hours to get ready for work... Wish me luck!
Seed Stitch Border Dishcloth by Jenny Fish
Seed Stitch Border Dishcloth
I'm looking for test knitters that would like to try this pattern and leave feedback. Please comment below if you are interested.
Materials:
1 Ball Cotton Yarn
Size 10.5 US Knitting Needles
Darning Needle
Scissors
Tape Measure
Optional: Stitch Marker
Using the long tail cast on method CO 27 stitches
Row 1 (RS): (K1 ,P1) to end of row
Row 2: Knit the purls, Purl the knits to end of row
Row 3: Repeat Row 1
Row 4: Repeat Row 2
Row 5: (K1,P1) two times, PM, K19, PM, (P1,K1) to end of row
Row 6: (K1,P1) two times [to Marker], P19, [to Marker] (P1,K1) to end of row
Repeat rows 5 and 6 until piece measures 6 inches.
Repeat Rows 1-4.
Cast Off all stitches.
CO= Cast On
K = Knit
P= Purl
PM= Place Marker
RS= Right Side
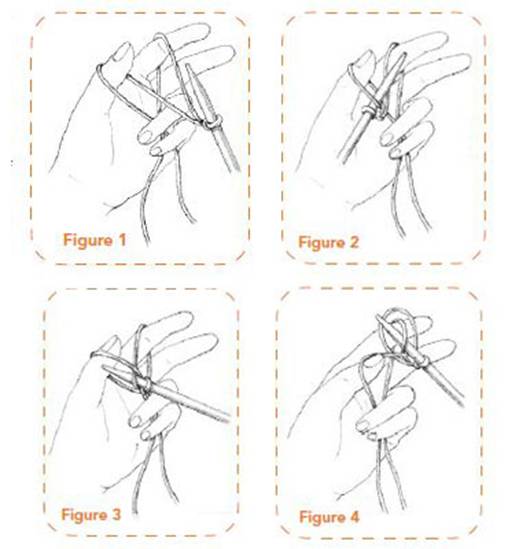
Knitting Cast-On
CO=Casting On is the term for making the foundation row of stitches on your needle.
To begin, you will need a pair of knitting needles and a skein (also called a 'ball' or a 'hank') of yarn. The terms 'skein' , 'ball' and 'hank' refers to the form factor for the bulk yarn.
- A 'skein' is the form that the yarn is in when it wound by the manufacturing equipment. Some skeins are designed so that you can pull the yarn from the inside as well as the outside. These are called 'pull skeins.'
- A 'ball' is yarn that has been rolled into a ball (sometimes done by knitters for convenience or to divide a skein into multiple quantities for use)
- A 'hank' is the yarn wound loosely in a circle. Hanks are common in hand-spun or hand-dyed yarn, but are not common in commercially-prepared product. If your yarn is in a hank, it will tangle easily and it is advisable to roll it into a ball before beginning work.
Long-Tail Cast-On
Also known as Double Cast-On or Continental Cast-On
It creates an even, stretchy edge that works well for stockinette stitch or for ribbing. It's easy to knit from, easy to pick up stitches from, and is also the fastest cast-on.
Tip: When a pattern calls to "cast on loosely" (like sock cuffs and turtle necks), do this cast on over two needles held together as one. Results are a cast on that is literally as stretchy as your ribbing. Dangle the tail from your thumb for two reasons: 1) Your tail length will not fluctuate with the needle size, so it's easier to estimate yarn. 2) The yarn on the thumb side will tend to "untwist" as you go, but since it's not attached to the ball end it's easy to reintroduce the twist as you wish.
Slip Knot
For most methods you will need to know how to make a Slip Knot.
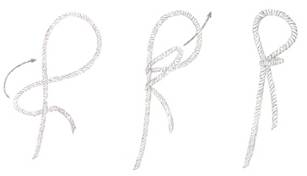
Pick up the yarn with your left hand.
Create a loop by taking the long end of the yarn (attached to the ball) and winding it over the top of the shorter end. Hold the point where the yarns cross, creating the loop, tightly between your left thumb and forefinger.
Use your right hand take the long end of the yarn (attached to the ball) and put it under the loop and up through it, creating a new loop.
Take the new loop with your right hand and pull until the first loop has tightened
Place this new loop over the end of your knitting needle and pull the long end of the yarn to close the loop over the needle.
Seed Stitch
Seed Stitch involves one row of knit 1, purl 1 followed by one row of knitting the purl stitches and purling the knit stitches.
This is a good texture stitch to use for borders because of the stacking of stitches the fabric will not roll.
Casting Off-
Is a finishing method to remove live stitches from needles.
Knit the first two stitches. When you have two stitches on the right needle, use the tip of the left needle to pull the first stitch up and over the second stitch. Leaving one stitch on the right needle. Knit the next stitch and repeat the process until you have one stitch left on the right needle.
Leaving a few inches clip your yarn and pull the end through the loop and pull tight to secure the stitch.
Weaving the Ends:
Weave the end of the yarn through several stitches to secure the end, using a darning needle or sewing needle. Hint: if you have a slick yarn, you can tack it down with sewing thread.
Saturday, May 30, 2015
PCOS Provisional Cast On Socks by Jenny Fish
PCOS The Provisional Cast On Socks
These are two at a time toe up magic loop provisional cast on socks! Wow that is a mouth full!!
This is the first time I have used the Provisional Cast on method for Socks and I really like this method for getting the socks started. I found it less fussy than other methods and I felt like I was making progress much faster with less effort.
They have a tiny mock cables making up this simple but elegant design. The small twists in the fabric represent to me, the twists of life. The provisional cast on represents that sometimes you just have to start in the middle, then go back and pick up the stitches to make something whole.
Materials:
I'm using a wool blend sock weight yarn from my stash. When the project is done I will let you know how much yarn I used.
Size 2US needles with a 40" cable
Size G Hook and waste yarn
Cast On 28 (32) stitches for each sock.
Using a provisional cast-on, cast on 28 (32) stitches (this will be half the circumference of the sock).
Provisional Cast-On:
Using waste yarn, crochet a chain that is a few chain stitches longer than the number of knit stitches you need. Knit into the spine of the back side of the chain, 28 (32) stitches.
Purl back across stitches.
Row 1, Sock 1: Knit 27 (31) stitches. WYF Slip the last stitch as if to Purl
Row 1, Sock 2: Knit 27 (31) stitches. WYF Slip the last stitch as if to Purl. Turn Work.
Row 2, Sock 1: Wrap the yarn loosely around the first stitch and slip stitch as if to Purl, Purl across to before the last stitch 26 (30). Move the working yarn as if to Knit and Slip last stitch.
Row 2, Sock 2: Wrap the yarn loosely around the first stitch and slip stitch as if to Purl, Purl across to before the last stitch 26 (30). Move the working yarn as if to Knit and Slip last stitch. Turn Work
Row 3, Sock 1: Wrap the yarn loosely around the first stitch and Slip, knit across to the last stitch before the unworked stitch 25 (29), WYF Slip remaining stitches.
Row 3, Sock 2: Wrap the yarn loosely around the first stitch and Slip, knit across to the last stitch before the unworked stitch 25 (29), WYF Slip the next stitch and turn.
Row 4, Sock 1: Wrap the yarn loosely around the first stitch and Slip, Purl across to the last stitch before the unworked stitch 24 (28), WYF Slip remaining stitches
Row 4, Sock 2: Wrap the yarn loosely around the first stitch and Slip, Purl across to the last stitch before the unworked stitch 24 (28), WYF Slip the next stitch and turn
Repeat Rows 3 and 4: Remember to slip the unworked stitches from each sock so that you can work two at a time. When you have 7 (9) wraps on the left side, 14 (14) working stitches in the middle, and 7 (9) wrapped on the right side. (remember to slip the unworked stitches for each sock back and forth so you can work 2 socks at once)
Your Toe is now half way done.
With right side facing you. This will be a knit row, you will now begin incorporating your wraps and closing up the holes to form the cup for the toes of the socks. If you prefer a narrow toe, continue with Row 3 and Row 4. If you want a more square toe do less of Row 3 and Row 4. The working stitches in the middle will determine the width of the point of the sock.
Row 1, Sock 1: With 7 (9) [Note: these numbers will decrease by 1 every time you repeat this row] stitches on right needle Knit across the 14 [Note: this numbers will increase every time you repeat this row] middle stitches across to the first wrapped stitch. Use the tip of your needle to pick up the wrap from the back side of fabric and place it on the left needle and knit it together with the stitch. WYF, Wrap the next stitch (so that it now has two wraps) and slip remaining stitches.
Row 1, Sock 2: Slip the 7 (9) [Note: these numbers will decrease by 1 every time you repeat this row] wrap stitches, then Knit across the 14 [Note: this numbers will increase every time you repeat this row] middle stitches to the first wrapped stitch. Use the tip of your needle to pick up the wrap from the back side of fabric and place it on the left needle and knit it together with the stitch. WYF, Wrap the next stitch (so that it now has two wraps) and slip then turn.
Row 2, Sock 1: Slip the first (double-wrapped) stitch and purl across to the first unworked, wrapped stitch. Pick up the wrap from the back of the fabric and purl it together with the stitch. Wrap the next stitch then slip remaining stitches.
Row 2, Sock 2: Slip the 6 (8) wrapped stitches, then purl across to the first unworked, wrapped stitch. Pick up the wrap from the back of the fabric and purl it together with the stitch. Wrap the next stitch and turn.
Continue until you have worked all the stitches and you once again have 28 (32) working stitches.
Unzipping the Provisional Cast-On:
Insert the tip of your needle into the stitch you knit up from the Provisional Cast-On. Then undue the tail of your waste yarn by pushing in back through the last loop and unzip the chain slowly as you pick up the live stitches from your Cast-On.
You now have a total of 56 (64) stitches.
Knit in the round using magic loop for 2 rounds.
Top of the foot: (Rounds will be the same for both Socks)
Round 1: K1 (P2, 1X1 Cable) until the last 3 stitches, P2, K1
Round 2-4: K1 (P2, K2) until the last 3 stitches, P2, K1
Bottom of Foot:
Knit all stitches
Repeat the established pattern until you are 2 1/2 inches from the back of the heel of the person you are making the sock for.
Turning the Heel:
With the Bottom of the Foot facing you, you will begin the heel.
Row 1, Sock 1: Slip the first stitch then K27 (31)
Row 1, Sock 2: Slip the first stitch then K27 (31)
Row 2, Sock 1: Slip the first stitch then P26 (30), then slip the last stitch
Row 2, Sock 2: Slip the first stitch then P26 (30), Turn
Repeat Rows 1 & 2: Until you have 14 (16) slip stiches on the side of your work. These stitches look like a chain on the side of the heel flap. Then repeat Row 1, so you will finish with the Purl side facing you.
Short Rows:
With the Purl side facing you.
Row 1: SOCK 1: Slip the first stitch, P14 (20), P2togo, P1(then slip the remaining stitches)
Row 1: SOCK 2: Slip the first stitch, P14 (16), P2togo, P1 (turn)
ROW 2: SOCK 1: S1, K1 6 times, SSK, K1 (then slip the remaining stitches)
ROW 2: SOCK 2: Slip the first stitch, S1, K1 6 times, SSK K1 (turn)
ROW 3: SOCK 1: S1, Purl to 1 before the gap, P2togo, P1 (then slip the remaining stitches)
ROW 3: SOCK 2: S1, Knit to 1 before the gap, SSK, K1 (turn)
Row 4, Sock 1: S1, K1 to 1 before the gap, SSK, K1 (slip remaining stitches)
Row 4. Sock 2: Slip stitches to working yarn, K1, S1 to 1 before the gap, turn
Repeat Rows 2 and 3 until you have 14 (16) stiches remaining.
With right side facing.
SOCK 1: S1, K1 until 2 stitches remain, SSK. Then pick up 14 (16) stitches from the heel flap plus 1 from the row below the first stich at the top of the foot (this will help close the gap at the join).
SOCK 2: S1, K1 until 2 stitches remain, SSK. Then pick up 14 (16) stitches from the heel flap plus 1 from the row below the first stich at the top of the foot (this will help close the gap at the join).
The front of the socks should be facing you at this point. Knit across the top of the foot in the established pattern.
.
Leave this stich on the left needle and pull the right needle
SOCK 1: Knit into the stitch below (this closes the gap) pick up 14 (16) stitches. Knit remaining heel stitches.
SOCK 2: Knit into the stitch below (this closes the gap) pick up 14 (16) stitches. Knit remaining heel stitches.
Gusset Decrease:
With top of foot facing. Work across the top in the established knit pattern.
Heel Decrease.
Round 1: K15 (17), PM, (Sl, K1) over 14 (16) stitches, PM, K15 (17) (Repeat for Sock 2), Knit across the top of both socks in established pattern.
Round 2: K1, SSK, Knit to marker, S1, K1 until next marker, Knit until 3 stitches of this side, K2tog, K1 (Repeat for Sock 2), Knit across the top of both socks in established pattern.
Round 3: K14 (16), S1, K1 to next marker, K14 (16) (Repeat for Sock 2), Knit across top of both socks in established pattern.
Repeat Rounds 2 and 3 until you have 28 (32) stitches for the back of each sock.
Then knit both sides of each sock in the established pattern for the top of the foot until desired length of Leg.
Ribbing & Bind Off:
Change to K1, P1 ribbing for an inch. Then Bind off in desired method.
Wednesday, May 27, 2015
How I learned to Knit
Welcome to Jenny Fish Knits.
This is my blog sharing my knitting adventures.
Let me start by sharing how I originally got into knitting...
February 2007
My oldest son Caleb was in 5th grade. He was struggling at school and I had to place him in a special school for behavior issues. This school was a therapeutic school, it require parental interaction and it became very clear to me that I needed to stop working and focus on my son and his needs. After budgeting and planning I quit my day job and became a full time stay-at-home mother. After my son settled in and his behavior issues settled down I found myself with blocks of free time that I didn't know what to do with. As a young girl my Grandmother had showed me how to cross stitch, crochet and do needle work. I tried cross stitching again, but my eyes didn't seem to want to focus on the tiny holes in the Aida cloth. When I tried to crochet everything turned out like an upside down bikini bottom and I didn't seem to place my hook in the right place.
One day I was chatting with by best friend Becca, and out of no where I stated I wanted to learn how to knit. Let me take a second to introduce Becca. She is my partner in crime, the one that has always has my back, stands by my side and encourages me to be the person I am. She has amazing faith in me and always lifts me up when I'm down, and pulls me back to reality when I need a swift kick in the butt. If ever their was such a thing as a soul sister, kindred spirit or sister from another mother... That is My Becca! If you know me, you know the name Becca.
Okay, so back to me blurting out that I wanted to learn how to knit. To my surprise she said she did too! She set out looking for a knitting class and found one at a craft store in Oklahoma City. She signed us up for the class. The class cost us $20 a person and lasted two hours. We got our supplies and went to the class. Now, this class was a beginners class. By that, I mean a true beginners class. We spent two hours waiting on the rest of the class to learn how to make a slip knot.
By the time we got out of the class we were both disappointed in how slow the class moved. How the instructor didn't seem to be a fit for us. After the class we went home and I searched YouTube for videos on knitting. I found a few that seemed promising. I took out my aluminum needles and cheap acrylic yarn and set in front of the computer determined I was going to figure out how to do this Cast On sling shot looking thing. I played with the needles and yarn for hours. Eventually I got it!
I called Becca and we made plans for her to come over so I could show her my new found trick. Between Becca and I, we figure out the Cast On, the Knit stitch and after some time we learned how to purl. We mucked our way through a few dish clothes and soon we learned scarves and baby blankets.
By this time I was feeling pretty good about us knitting. Becca found a knitting group called Stitch and Bitch at a local yarn store. So we packed up our aluminum needles and acrylic yarn and joined the group. When we walked into the yarn shop it was like a light shined from above and the angles sang Halleluiah. We learned several things that day. Yarn can me made out of more than just acrylic, needles can have cords and be made out of other materials. The ladies in the group educated us. By the time we left that night we had been schooled!
We continued to visit the group and soon we learned how to make hats, gloves, sweaters and even SOCKS!
Subscribe to:
Posts (Atom)